Documentation
In this page we can see all the documentation about the Blask Project:
- Init Blask
- Configure Blask
- Create a Post
- Post Metadata
- Create a Template
- Special Pages
- Custom Error Pages
- Tag Search
- Category Search
- Author Search
- Search pages
- Sitemap Generation
- Blask Command Line Tool
- Using WSGI server with Blask
- Using Docker with Blask
- Use PythonAnywhere with Blask
Init Blask
To init and use Blask you need Python 3.6 or later. you can use pip to install Blask.
pip install blask
or use the source code:
git clone https://github.com/zerasul/blask/
You also need the following dependencies (Only if you clone the source code):
- Flask
- Markdown
- Markdown-full-yaml-metadata
- Pygments
These dependencies can be easily installed using pipenv:
pipenv install
If you need to install the development dependencies, use --dev flag.
pipenv install --dev
NOTE: Requirements.txt its no longer available.
If you want to run Blask, use the next code to create a standalone app:
import argparse
import logging
from blask import BlaskApp


if __name__ == '__main__':
    # Argument parsing
    parser = argparse.ArgumentParser()
    parser.add_argument(
        "-d", "--debug", action='store_true', help="Verbose output")
    parser.add_argument(
    "-v", "--verbose", action='store_true', help="Verbose output")
    args = parser.parse_args()

    if args.debug or args.verbose:
        log = logging.getLogger()
        level = logging.getLevelName('DEBUG')
        log.setLevel(level)
        debug = True
    else:
        debug = False
    BlaskApp().run(debug=debug)
There is an alternative for manual running; using the Blask CLI Tool:
blaskcli run
NOTE: The Blask CLI Tool is only available if you install Blask using setup.py (or using pip).
Now you can browse to http://localhost:5000.
Configure Blask
Blask needs a settings file with all the configuration of the application; you need to create a settings.py file.
Here is an example:
import os

BASE_DIR = os.getcwd()

# Templates directory
templateDir = os.path.join(BASE_DIR, 'templates')

# Posts directory
postDir = os.path.join(BASE_DIR, 'posts')

# Default layout template
defaultLayout = "template.html"

# Static files directory
staticDir = os.path.join(BASE_DIR, 'static')

# Website title
title = 'Blask | A Simple Blog Engine Based on Flask'

# errors handle dictionary
errors = { 404 : '404',
    500 : 'mycustom500'
    }
Here is the description of each configuration:
- BASE_DIR: Where is the working directory.
- templateDir: Templates Folder. All the HTML for the templates must be there.
- postDir: Posts Dir. All the markdown blog posts must be there.
- defaultLayout: Default template file. This file must be in the templateDir folder.
- staticDir: Static resources folder. All the css, js, img must be here.
- title: Default title for the site.
- errors: To set up custom errors for HTTP error codes.
Since: 0.10.
Blask uses the enviorement variable BLASK_SETTINGS to get the entire configuration.
export BLASK_SETTINGS=settings
where settings have the configuration module of Blask.
If you want to use the default values; you can see them here:
- TemplatesDir: templates.
- postDir: posts.
- defaultLayout: template.html.
- staticDir: static
- tittle: Blask | A Simple Blog Engine Based on Flask
Create a Post
Creating a new blog post is very easy with Blask. First you need to create a Markdown file with .md extension in the Posts Folder
(See configuration). Here is an example:
---
date: 2018-04-04
template: template.html
tags: about,blask
---
This is an example of **post** in blask.

With _MarkDown_ you can easily create great posts.
In the previous Markdown text, we can see 2 parts:
-
The first part is between "---" characters. This is the Metadata part, which contains information about the post, like the date, the template file that we want to use, and the tags associated with this post.
-
The second part is the content of the post; here you can use Markdown to write all the text that you need. If you need more information about the Markdown syntax, check the Markdown Documentation.
Post Metadata
Here is the description of the metadata used in posts:
- date: Date of the post. Must be in
yyyy-mm-ddformat. - template: Template file for the post. This is the filename and must be in the templates folder.
- tags: List of tags separated by comma.
- category: Category of the post.
- author: Author of the post.
- title: Title of the post; it will be shown as the html title of the page. If no value is provided the settings title will be used.
- periodicity: the value of the changefreq tag on the sitemap Screen. The values of this metadata are: always, hourly, daily, weekly, monthly(default), yearly, never.
Create a Template
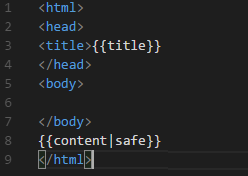
Blask uses Jinja2 to render the HTML templates. To create a template, you have to create a new HTML file in templates folder.
Once the file is created, add your HTML and include inside a Jinja2 variable called content, which must have the scape modifier.
Also, if you need to show the metadata information you can add some additional variables.
{{date}}: variable with the post date.{{tags}}: variable with the list of tags.{{category}}: variable with the category of the post.{{author}}: variable with the author of the post.
Special Pages
With Blask you can edit the content of 2 Special Pages:
- index page: This is the main page. Its markdown contents reside in the index.md file in the posts folder.
- 404: This is the Page Not Found response. Its markdown contents reside in the 404.md file in the posts folder.
Custom Error Pages
(Since 0.1.4)
With Blask you can set custom error pages for the HTTP error codes. In the settings file, you can set the errors dictionary for link each HTTP error code to the name of the markdown file (without extension), in the post directory.
# settings.py
...
# errors handle dictionary
errors = { 404 : '404',
        500 : 'mycustom500'
        }
Tag Search
With Blask you can search posts by their tags. To see the posts with one particular tag, browse http://< url >/tag/< tag-name >.
Since 0.1.2: By Default, the list is Date Ordered (Most New First).
Category Search
With Blask you can search posts by his category. To see the posts with one particular Category, browse http://<url>/category/<category-name>.
Since 0.1.2: By Default, the list is Date Ordered (Most New First).
Author Search
With Blask you can search by Author. To see the posts with one particular Author, browse http://<url>/author/<author-name>.
Since 0.1.2: By Default, the list is Date Ordered (Most New First).
Page Search
With Blask you can search by post contents. To do this, just send a POST request to http://< url >/search with the search parameter set to your search criteria.
Since 0.1.2: By Default, the list is Date Ordered (Most New First).
SiteMap Generation
(since 0.2.1)
Blask, have an Sitemap.xml file automatic generation. To see the sitemap file generated, open the next URL http://< url >/sitemap.xml and the sitemap xml formated file is showed. Here is an example:
<urlset xmlns="http://www.sitemaps.org/schemas/sitemap/0.9">
    <url>
        <loc>http://localhost:5000/</loc>
        <lastmod>2020-03-13</lastmod>
        <changefreq>monthly</changefreq>
        <priority>0.5</priority></url>
    </url>
...
NOTE: the date showed is based on the Modification date of the Markdown File.
Blask Command Line Tool
(Since: 0.1.0b12)
The Blask Command Line Tool, is a program that you can use for control Blask and have some features. For example for create a new Blask project. For use the Blask CLI Tool, you need to install Blask using the setup.py script ( using pip).
Usage of Blask Command Line Tool:
Usage: blaskcli [OPTIONS] COMMAND [ARGS]...

Commands:
    init  Initialize a new Blask Project
    run   Run the instance of blask
There are two commands available:
init: creates a new Blask project creating the default folders and minimum files; in the current directory.
Usage: blaskcli init [OPTIONS]
Initialize a new Blask Project
Options:
    --with-docker  Add a DockerFile to the Blask directory
run: run a new instance of blask in the current directory.
Usage: blaskcli run [OPTIONS]
Run the instance of blask!

Options:
    --debug         Init with de debug flag
    --port INTEGER  Port where the server is listening
    --host TEXT     Default Network interface listening
Using Gunicorn for WSGI server
Using the Blaskcli run command is only recommended for developing pruposes. For production Systems, please use a WSGI server. First, you need to install gunicorn:
pip install gunicorn
After installing you need to configure your application to use an wsgi server; here is the code to use Blask with WSGI:
from blask import Blaskapp
application=BlaskApp().app

if __name__ == '__main__':
    application.run()
Now you can save the preivous Python Script, as main.py and run gunicorn with the next command:
gunicorn -b 0.0.0.0:8000 --workers 4 main
The workers options means that there are 4 workers serving the application; you can change this option following the gunicorn documentation.
Lastly, go to http://< yourdomain >:8000 and see your blog using blask. For more information about using Flask with WSGI go to Flask documentation.
Using Docker with Blask
To use Docker with Blask; you need create a Docker Image to use with Blask; you can find it in Docker Hub. To use it pull the image with Docker:
docker pull zerasul/blask
and create a new container with the minimum configuration:
docker run -p 5000:8000 zerasul/blask:latest
The image expose the port 8000 so you need to make a forwarding with the -p option.
Now you can see on http://< your domain>:5000 your Blask Docker container working.
For more information about Docker please see the Docker Documentation.
Use Python Anywhere with Blask
Python Anywhere is a service that brings you the posibility to deploy and run python scripts and web based applications. For more information about what is Python Anywhere and how to use it, please see Python Anywhere Web Page.
You can use Python Anywhere to run and deploy you Blask based applications; all you need to do is create a new account, and follow the next steps:
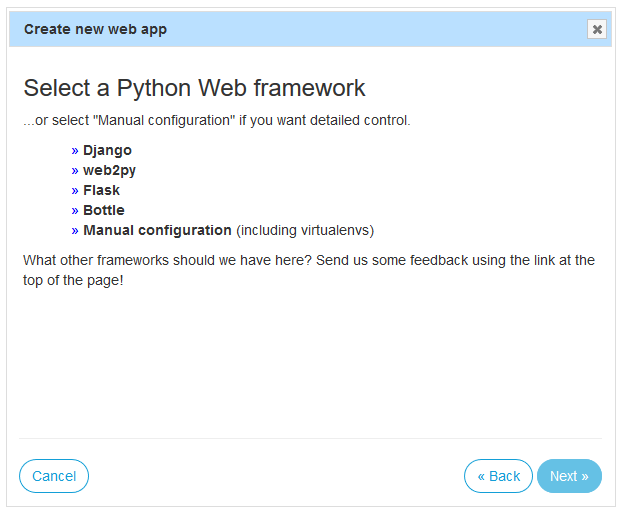
1 Create a new Web Application based on Flask and select a python version >3.6. Set the python flaskapp.py file with the default address /home/<your user>/mysite/flask_app.py.
2 Open a bash console on your site directory.
3 Install Blask with your site python version.
pip3.7 install blask
NOTE: If you are using a virtualenv, follow these instructions.
4 Create a new empty blask project with blaskcli init command.
blaskcli init
NOTE: Also, you can copy the files of your existing blask application.
5 change the content of your flask_app.py file with the following lines of code:
from blask import BlaskApp

app=BlaskApp().app

if __name__ == '__main__':
    app.run()
6 Reload your application with the reload button on the web apps section.

Now you can see your Blask application on your web app Url on PythonAnywhere.